Online Cloud Security Logo mobile

How to Configure pfSense Firewall - Step by Step Guide

Dave Miller with Online Cloud Security

Dave Miller – Tech Enthusiast & Security Expert – May 3rd, 2022

How to configure pfSense Firewall step by step guide

Have you already gotten your hands on a great free firewall and VPN service but are unsure how to configure pfSense firewall step by step? I’m assuming you’re familiar with a firewall as a network security device or software that analyzes incoming and outgoing packets at this point. Your typical off-the-shelf router is not very stable, has restricted capability owing to manufacturer lock-down, and may be vulnerable to many software flaws. Because most operating systems provide an elementary built-in firewall, this is where pfSense comes in. Employing a third-party firewall program, such as pfSense, typically provides greater control choices and more reliable results.

Continue reading the post to learn more about how to set up pfSense since if you don’t know that, it’s of no use to you.

How to Configure pfSense Firewall - Summary

Importance of Firewall – Need of Hour

The magnitude and intensity of global cyber threats and how we respond will have far-reaching implications for the Internet’s forthcoming. Your computer will always be vulnerable to attack if connected to the Internet or a WiFi network. It would help if you had as much security from external threats as possible to prevent data loss.

A firewall is one approach to defend the computer from external threats. It creates a firm boundary between your home network and the rest of the Internet, preventing attacks from spreading over the Internet. With your operating system, you might get by with just a router and the standard software firewall. However, you may not always require the enhanced security provided by a more sophisticated approach.

Because the problem is that 83 % of WiFi routers in US homes and companies get not appropriately updated for security flaws, putting their users in danger of cyberattacks. That’s where I’m talking about pfSense, a firewall and router software that’s completely free to use and modify as long as you have the necessary hardware.

pfSense – What You Need To Know

The world’s leading Firewall is pfSense® Plus software. It has the same functionality as the most costly commercial firewalls. pfSense contains functionality that isn’t accessible in commercialized closed source solutions in some circumstances. Users worldwide have praised and adored the program, downloaded over 3 million times. Thanks to open-source software, this is feasible.

Built on the FreeBSD operating system with a modified kernel, the free network firewall distribution contains third-party free software packages for added capabilities. It’s usually a software firewall that serves as a DHCP server, DNS server, VPN server, and WiFi access point, all on the same physical device.

pfSense Firewall Installation Hardware Requirements

For hardware, needs will get determined by the number of rules and VPNs installed on your device, along with data passing through it. A CPU with a base rate of 600MHz, 512MB RAM, and at least 4GB of storage – either on an HDD or a flash drive in order to backup your files on your PC. Now I’ll go right into setup and show you how to configure pfSense firewall step by step on your computer.

How To Configure pfSense Firewall Step By Step

Follow the steps below, starting from the installation and basic steps for configuration of the VPN:

How to Configure pfSense Firewall: Installation

Installation is quick and smooth, making it simple to set up. Still, it might be problematic for users who are unfamiliar with firewalls. take the actions outlined below

You can download the Latest Stable Version from here.

Installation is quick and smooth, making it simple to set up. Still, it might be problematic for users who are unfamiliar with firewalls. take the actions outlined below

You can download the Latest Stable Version from here

Configuration Menu

The web-based GUI is used to configure the majority of the pfSense® software. After you’ve completed the basic installation of pfSense, It will give very choice available in the pfSense online configurator.

You can find the individual guide for all the eight items you see in the menu on the official website >>

  • System
  • Interfaces
  • Services
  • Firewall
  • Status
  • Diagnostics
  • Help
 

I will discuss the Firewall configuration here in detail.

Firewall Configuration Using Web Interface

To use the pfSense web configurator, go to https://[your LAN IP address] in an internet browser on a connected computer to your Firewall. It’s 192.168.1.1 by default. On the login screen, enter your username and password. You’ll notice the Firewall menu, which allows you to customize the Firewall’s behavior as it sends packets over the network. So, for example, setting aliases, implementing NAT and firewall regulations, and traffic shaping are all done from here. First, I wil go through the firewall menu

  • Aliases: Aliases get used to identifying ports, addresses, or networks. Firewall rules, port forwarding, outgoing NAT rules, and other locations in the firewall GUI can use aliases.
  • Rules: It will determine what traffic your Firewall allows and what is blocked.
  • Schedules: It allows you to establish a firewall schedule that specifies when a firewall rule is activated, including the hours, dates, and days of the week.
  • Traffic Shaper: Traffic shaping is a bandwidth control approach that limits the flow of specified network packets to maintain network performance.
  • Virtual IPs: Virtual IP addresses are IP addresses that get not assigned to any of your system’s physical interfaces. Through these Virtual IPs, pfSense® software allows the usage of multiple IP addresses in combination with NAT or local services. In pfSense, there are four different types of virtual IP addresses:
 

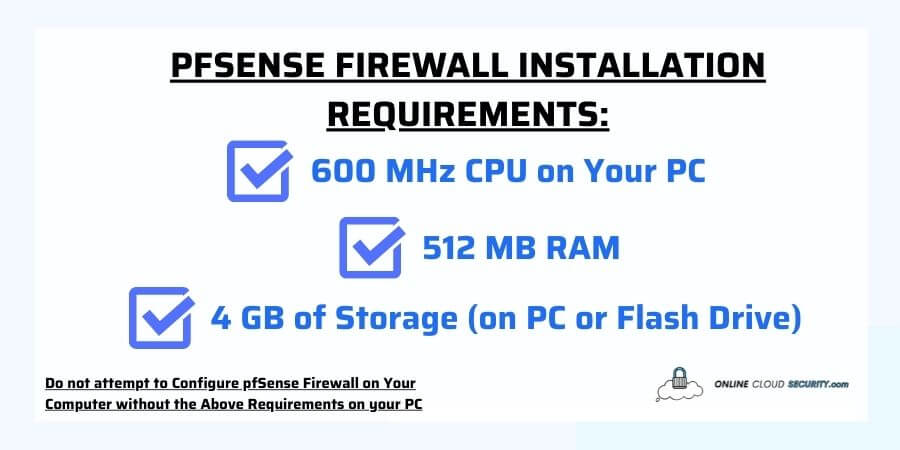
Setup Wizard from Netgate

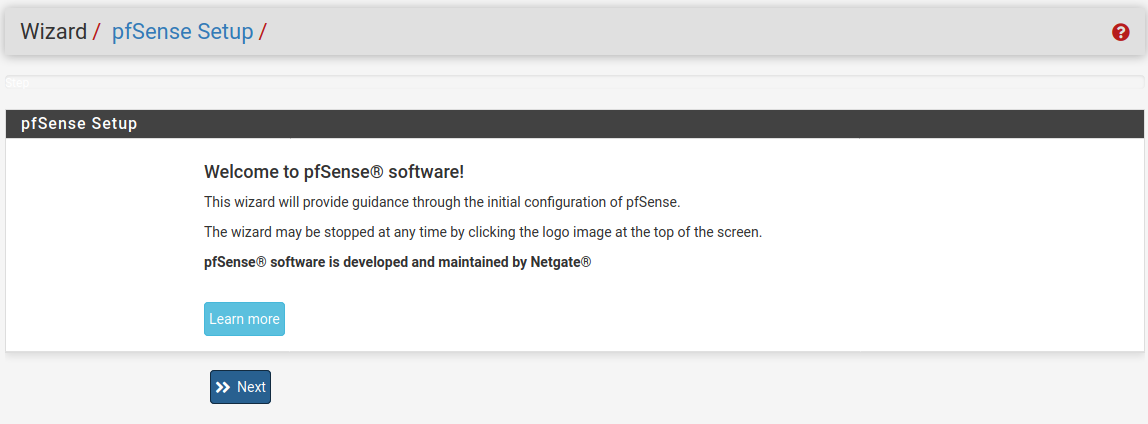
The Setup Wizard appears automatically the first time the user connects to the pfSense GUI; follow the below steps

Step: 1: Basic Information

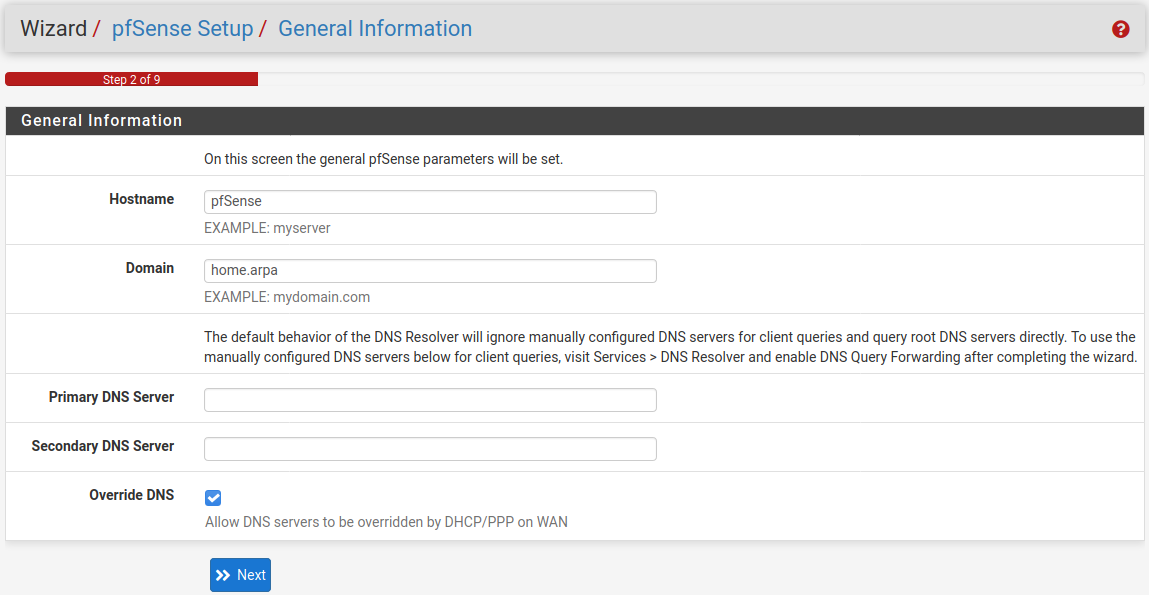
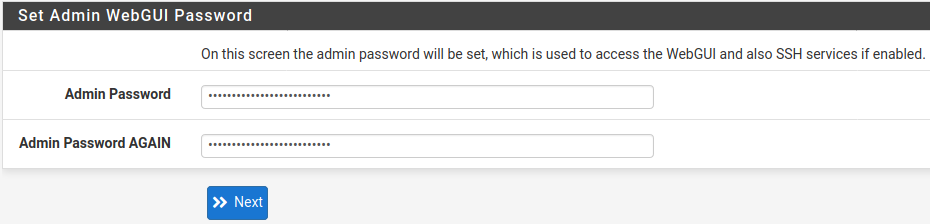
Click Next once again to begin the wizard’s configuring procedure. The user will get prompted for further firewall configuration information in the next phase, such as Hostname, domain name, and DNS servers.

  • The Hostname should get used to distinguish this Firewall from others.
  • Select a Domain
  • If available, the IP addresses of the Primary DNS Server and Secondary DNS Server.

Add in the information and Click Next to continue.

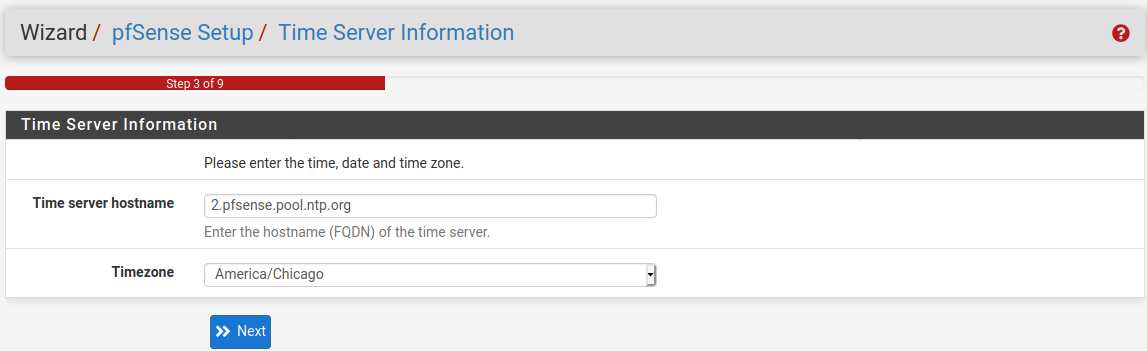
Step: 2: Network Time Protocol

Under Network Time Protocol, the following screen contains time-related choices. Unless you want to use separate time servers, you may keep it. To continue, click Next.

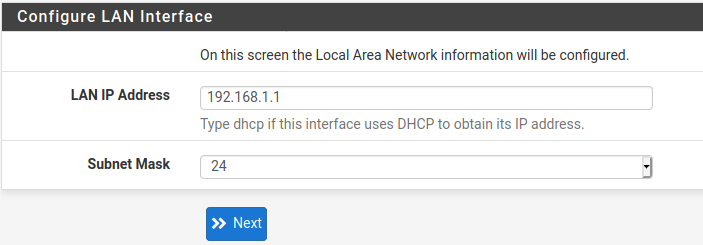
Step 3: WAN Configuration

The Firewall’s WAN interface gets configured on the following page of the wizard; pfSense provides different techniques for setting the WAN interface. The default setting is DHCP since it is the most popular. It allows a firewall to function without additional setup in most circumstances. Static, PPPoE, and PPTP are different choices. Typically, the MSS and MTU fields can be blank; however, they can get altered if required. If you’d like to learn more about it, click below.

Step 4:  LAN Configuration

The LAN interface will get configured with the next choice. The LAN IP Address and Subnet Mask get configured on this wizard page. The default 192.168.1.0/24 network may be acceptable if this Firewall will not connect to any other network through a VPN.

If this network needs to connect to another network, such as using a VPN from a remote location. If your LAN IP address needs to be updated, type it in here along with a new Subnet Mask.

Step 5: Set Password

The administrator will get prompted to update the default password for the pfSense web interface on the following page. Because there will be no limits imposed automatically, it is advisable to select a secure and robust password.

Step 6: Reload

The final step is restarting pfSense with the updated configurations. When you click Reload, the GUI will apply the wizard’s settings and reload any services that have got altered.

The Firewall will have rudimentary Internet connectivity via the WAN at this point, and clients on the LAN will be able to access Internet sites through it. It’s worth noting that pfSense comes with a default allow-all rule. It should get modified for security reasons, but this is again a decision made by the administrator. To allow proper traffic across the Firewall, the administrator must go through and establish rules. 

If this initial setting has to get repeated, go to system> Setup Wizard from the GUI.

Bottom Line

pfSense is an excellent choice for setting up a quick and autonomous firewall device. I hope you were able to set the Firewall to a basic level after following the procedures above. It might be perplexing, so I’ve also included the official support articles. Now, if you need expert assistance setting up your deployment and are unsure how to do it. In that case, you may use their commercial support to get things set up and run. If you’ve installed pfSense software on your hardware, not on Netgate, and need help, you can contact Global Support.

**Onlinecloudsecurity.com is a participant in the Amazon Services LLC Associates Program, an affiliate advertising program designed to provide a way for websites to earn advertising revenues by advertising and linking to Amazon.com and affiliated sites. As an Amazon Associate we earn affiliate commissions from qualifying purchases.**

Dave Miller with Online Cloud Security

Dave Miller

IT Consultant at Online Cloud Security

Dave Miller is an IT Consultant for Online Cloud Security and has over 7 years of experience in the Information Technology space. He also specializes in repairing laptops & computers. In his spare time, he loves to talk about new technologies and hosts monthly IT and Cyber Security meetings in the Houston area.

Popular Reads:

Related Articles:

Share This Article with Your Friends!

Click any button down below to share this article on the following channels:

Facebook
Twitter
Pinterest
Email
Online Cloud Security Logo (500x500px)

About Online Cloud Security:

Online Cloud Security is here to recommend you the most secure devices, from laptops to smartphones, we only want to provide you with products that we have tested and used ourselves for online security. Every product that we recommend is heavily inspected and tested for security against hackers, viruses, malware, and any other intruders that may want to steal your information. 

Recent Posts:

Online Cloud Security Logo (500x500px)

About Online Cloud Security

Online Cloud Security is here to recommend you the most secure devices, from laptops to smartphones, we only want to provide you with products that we have tested and used ourselves for online security. Every product that we recommend is heavily inspected and tested for security against hackers, viruses, malware, and any other intruders that may want to steal your information. 

Recent Posts: