It is stressful and uncertain for everyone, including families, parents, and children. As a result, new laptops and desktop computers were in high demand during the pandemic. You can always end up taking a picture of your zoom meeting or use your phone to take a picture of the class notes, but, doing it fast and accurately is not always possible.
You or someone around you is most likely taking notes in high school, college, or even business meetings. What makes you think you’ll recall the most significant elements from your staff meeting, presentation, or seminar if you can’t remember what you had for lunch yesterday? Therefore taking a screenshot is similar to taking notes.
Screenshots are an excellent technique to save information in an image file for later use. You may also utilize the image to successfully communicate or exhibit it as a recollection from a video chat. Because HP laptops are so ubiquitous, and you’ve probably seen them in many offices and schools, you’re probably already familiar with how to use them. One of the skills you’ll need is the ability to snap screenshots.
Fact:According to Futuresource, roughly 30 million laptops and tablets were purchased by schools in the United States, while 2.2 million were purchased directly by parents during early lockdowns
To put it another way, knowing how to capture a screenshot, regardless of the computer brand you’re using, maybe pretty helpful. However, various methods for taking screenshots with your HP Laptop are detailed below.
How To Take Screenshots on HP Laptop – Methods
These listed methods on how to take a screenshot will work on any HP laptop model you use:
Method#1: Using Just Your Keyboard Shortcuts
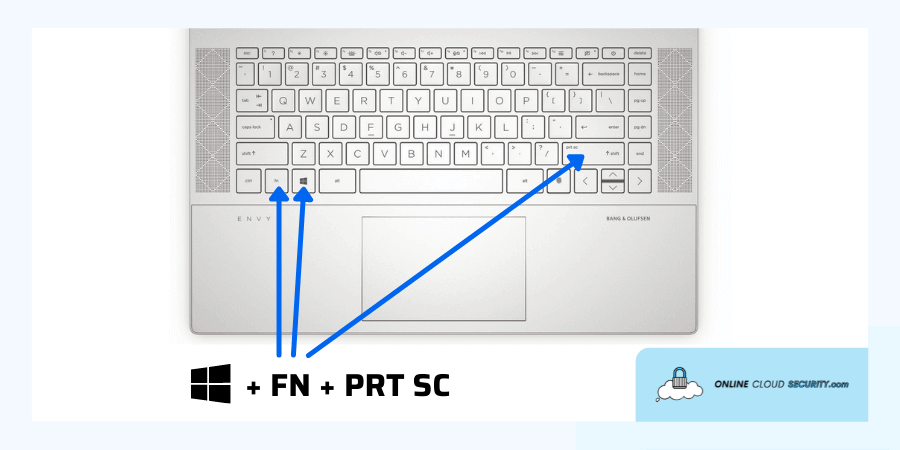
Keyboard shortcuts contain a surprising amount of functionality that we aren’t aware of at all times. Taking screenshots on HP laptops with Windows operating systems is as simple as pressing a shortcut key. PrtSc Print Screen is the primary keyboard key situated in the right corner of the keyboard. It’s the same as the home key, but it may only get used in conjunction with other keyboard keys to activate it.
The keyboard combinations you’ll need are listed below; they vary based on your model.
Windows logo key + Fn + PrtScn (or Prt sc on the Shift Key)
Windows logo key + PrtScn (or Prt sc on the Shift Key)
Windows logo key + Ctrl + PrtScn (or Prt sc on the Shift Key)
Note: Because screenshot shortcuts change by HP models, you should consult your laptop’s handbook for further information or utilize all of the combinations above one by one to capture that snapshot. After that, take the actions outlined below
Step #1: Press the right combination key simultaneously, as mentioned above.
Step #2: Screenshots get saved by default to This PC > Photos > Screenshots. Although, if the screenshot is not instantly stored there, it gets saved into the clipboard on your laptop. Now you must open any software that allows you to paste it, like Word, Paint, Photoshop, or any other tool supporting the CTRL+V shortcut.
Step #3: From the app where you pasted the screenshot, you must save it for getting it in jpeg or PNG format.
Note: Although this is the quickest way to record your screen, you will not choose a specific region; instead, the entire screen will get taken as a screenshot. You will need to modify the picture file afterward to obtain the desired results.
Method #2: Snipping tool
The snipping tool is available in nearly all HP laptops in Windows 10 & 11 and is a fantastic integrated feature that allows you to choose any any-size area of your screen for rapid capturing, regardless of whether your laptop runs on any Windows operating system from the previous two decades.
The snipping tool has a few more features that allow you to swap modes as needed.
Rectangular Sniping: It allows you to snap a screenshot in the shape of a rectangle, with the length and width determined by the cursor.
Window Sniping: With only one click, you may capture a screenshot of your active window.
Free Sniping: You can capture in any shape or form.
Full-Screen Sniping: Like the PrtScn technique, it captures a full screenshot.
As their names imply, all of these options allow you to create screenshots that focus specifically on the region you want to see in your screenshot, so decide how you want your screenshot to look.
Step #1: launch the snipping tool program from the Start menu by searching for it in the search box.
Step #2: Place the snipping tool in front of the window you want to take a snapshot of. Depending on the option you’ve chosen, click “New” to take a screenshot.
Step #3: The snipping tool will immediately display the screenshot you took, as well as provide you with a marking option that allows you to draw on your screenshot to make comments and point-outs that are obvious and easy to see.
Step #4: To save the screenshot, press the ctrl + S key combination on your keyboard and select the desired location in the opened window.
Step #1: To access the Snip & Sketch app, you can use a combination of keys Windows + Shift + S. A new toolbar will get displayed on the top of the screen with the same modes as previously present in the snipping tool. Alternatively, you can search for the snip and sketch app in the start menu.
Bonus info: if you open the snipping tool in the newest versions of windows, you will also see a label of Snip & Sketch app, suggesting you use it instead of the sniping tool
Step #2: Click the required mode and select the screen portion with the cursor from where you want the screenshot.
Step #3: The window will display the notice after you’ve clipped the screenshot. When you click the notification, you’ll get taken to the option of editing the screenshot, which is comparable to the snipping tool’s capabilities but considerably more extensive.
Bonus Tip: If you want to use the Snip & Sketch tool, you may set the PrtScn button to launch this program straight for screen captures. To do so, navigate to Settings > Ease of Access > Keyboard > Keyboard and check the box next to Use the PrtScn button to launch screen snipping under Print Screen Shortcut.
Third-Party App - Snapshots
A few third-party apps are relatively simple and provide extra features not available in the built-in selections. They provide your tool with more capability and make sharing other work productivity tools easier.
Note: Third-party applications may offer more alternatives, but they may not be completely free.
There are plenty to choose from, but we’ll focus on two in particular.
Snagit Application (Recommended by HP)
Snagit allows you to record your screen and camera in real-time, add context, and share photographs, GIFs, and videos. Take a screenshot of your whole desktop, a specific location, a window, or a scrolling screen. It allows you to copy information without having to retype everything quickly. Snagit allows you to instantly convert any recording into an animated GIF and embed it in a website, document, or chat.
Step #1: Use the camera symbol to take a screenshot of a picture or the recorder icon to take a screenshot of a video.
Step #2: Your image will display in the Snagit program when you pick the desired region.
Droplr for Advanced Screenshotting on HP Laptops
Droplr is a one-stop shop with extensive features, integrations, and comprehensive security with several integrations. It allows you to capture and share a screenshot quickly, and there’s no need to save files because everything gets stored on the cloud.
Final Thoughts
Taking screenshots on your HP laptop is simple using the methods mentioned in this article. It may take some practice at first, but it will become straightforward if you follow a technique that works for you. You don’t have to be concerned about making a mistake when capturing a screenshot; a couple of tries will undoubtedly lead to perfection.
You can capture a screenshot on your HP laptop using the standard methods, but if you’re a pro or want more capabilities, third-party software can also help.
**Onlinecloudsecurity.com is a participant in the Amazon Services LLC Associates Program, an affiliate advertising program designed to provide a way for websites to earn advertising revenues by advertising and linking to Amazon.com and affiliated sites. As an Amazon Associate we earn affiliate commissions from qualifying purchases.**
Dave Miller
IT Consultant at Online Cloud Security
Dave Miller is an IT Consultant for Online Cloud Security and has over 7 years of experience in the Information Technology space. He also specializes in repairing laptops & computers. In his spare time, he loves to talk about new technologies and hosts monthly IT and Cyber Security meetings in the Houston area.
Click any button down below to share this article on the following channels:
Facebook
Twitter
Pinterest
Email
About Online Cloud Security:
Online Cloud Security is here to recommend you the most secure devices, from laptops to smartphones, we only want to provide you with products that we have tested and used ourselves for online security. Every product that we recommend is heavily inspected and tested for security against hackers, viruses, malware, and any other intruders that may want to steal your information.
Online Cloud Security is here to recommend you the most secure devices, from laptops to smartphones, we only want to provide you with products that we have tested and used ourselves for online security. Every product that we recommend is heavily inspected and tested for security against hackers, viruses, malware, and any other intruders that may want to steal your information.